Email:ZaniahZavijava@gmail.com
Tuesday Tips
Current as of
These are in order of newest to
oldest
Vendor
Search - Find anything and everything you want!
by: miraljz
To find anything and everything you want to price,
locate, or buy in the entire galaxy, instead of spamming in front of the starport WHERE CAN I BUY A SWOOP 4000 times a minute, do
this:
Go to any bazaar terminal. If you can't find one,
type /find terminal:bazaar
and it will create a waypoint and a yellow ribbon leading you right to it.
Select Browse Market from the bazaar terminal. In the top row of tabs, select
the Vendor
Search option. Next, check the This Planet, or Entire Galaxy
box (whichever you prefer), then simply use the categories in the left-hand box
to search for whatever it is you want!
Combat Moves
This week, we have three combat moves
from Gen00b, Jedi-of-the-Hills,
and Etyrnal. Join in and post
your own successful combat moves too!
Rifleman Combo
Move
Knee-cap shot (rifleman) is quite
useful too if you want to slow down your opponent. They can't run for a few
seconds which gives you the time to move out of their range and stay within
rifle range (over 50m should do the trick). Combined with root this is very
effective.
By: Gen00b
Carbineer Combo Move
Carbineer's have a pretty cool combination of abilities. First is Charge
Shot. The target falls over and stays down for a round. Second is Crippling
Shot. Kinda like rifleman Kneecap shot in that the
target goes slow for the duration. If the target is a melee fighter, then this
helps because Carbineers are good at firing on the
move.
By:
Jedi-of-the-Hills
Bounty Hunter
Combo Move
I have a tip I use on my Mater BHMaster commando Pistols xxx4. Using Stopping Shot with a
commando weapon will make it an AOE. I have been able to root a whole group
with this.
By: Etyrnal
"NO DISINTEGRATIONS!" "As you wish..."
Selecting Draft
Schematics made easy
By: Warryyr
Someone mentioned this awhile ago, but
I thought it was worth repeating. I just updated my crafting macro with it and
it was great for when I learned new schematics and the schematic numbers
resorted.
Instead of specifying:
/ui action selectDraftSchematic 01
In a macro, and having to deal with
figuring out the exact draft schematic number in your datapad
(which can sometimes be a pain due to changing numbers, new learned schematics
at a new level, and so on), try replacing this line in your crafting macro (the
selectDraftSchematic line) with the following:
/pause 1
/ui action defaultButton
/pause 1
Now, open up the crafting window of the
crafting tool you want to use. Manually select the schematic you want to use
with your macro, and click Next, so that you are at
the window that lets you load resources into the schematic. Now press Esc to
close the window (or hit the little x on the upper right).
Now, fire up your crafting
macro.
The default chosen item to craft will
be the one you selected the last time you opened the tool.
The defaultButton
action and the 1 second pause will select Next for
you, bringing up the "add resources" window, and you never need
bother with finding a draft schematic number in your datapad
again!
Grab Bag 'o Tips
Each week, many community members post
great tips in this thread. This week, we've collected a few of the smaller tips
that folks sometimes forget.
If you know a tip, please add it to the
thread!
-----------------------
ALT-ENTER switches
between windowed mode and non-windowed mode.
~ By: MajorXP
-----------------------
CTRL-ENTER will open and close your
main chat window..
~ By: WizKid72
-----------------------
Musicians and Dancers can perform their
special effects with different colors!
/dazzle 1, /dazzle 2 will produce
different effects.
~ By: omadnay
-----------------------
Double-clicking on a droid in the datapad now calls the droid instead of examine it. You can
also put your Droid into the Toolbar now, as you can do it with your bikes and
pets. Clicking on the Droid/Mount in the toolbar calls it, if it's called,
clicking on it will store it.
~ By: Drecki
-----------------------
If you use the Onscreen Waypoint
Monitor you can select and deselect waypoints simply by clicking inside the
monitor window. You can even open multiple windows by selecting a 2nd or so on
waypoint. It's much quicker then accessing your datapad
and sorting through waypoints (and if your like me you
have 20+ to sort through haha).
~ By: Fion13
* SWG Classic
Interface Users should right-click.
-----------------------
For those who like looking at themselves or their own accomplishments, or want
to see how good their biography looks to other people,
type:
/ex self
~ By: Trenkor
-----------------------
Best tip I've had yet. . .
go to Ctrl-O and click on the interface button.
Click on Keymap.
click on the Chat Tab and Scroll down.
On the boxes that say "Chat
Copy", "Chat Cut", and "Chat Paste", rebind them to Shift+Ctrl+C, Shift+Ctrl+X, and Shift+Ctrl+V.
~ By: genkii
-----------------------
If you forgot which alias you already
set use /alias and you'll get the list.
~ By: Arnwald
Don't Miss
Critical System Messages
Tired of same color messages to every text, every system
message? You can't realize you have been
knocked down in PvP lag? Missing who called your name
in spatial spam? Tired of looking for message you wanted on long scrolls
of your chat tabs?
Here is how to customize your message colors on your screen.
Right click on one of your chat-tab names and press
"Add" and insert "System Messages"
from left selection menu to right and name tab as "System".
Open Options (CTRL+O) and click "Chat Color" from the
left menu.
Type "knocked down" on the entry field at bottom of option screen and pick the color red and then press
"Add Sentence Colorization".
You will see following messages as red color on your screen:
You have been knocked down.
You can't while Knocked down.
Another example, you are a Bounty-Hunter and often missing your
droid location while waiting for location. Again type Your target has been located and press Green color and "Add Sentence Colorization"
and you will see these messages in green. Or you want to know when your seeker
droid lost track of your target lost track word in red with Sentence customization will help a lot on your
long travels to your mark.
How about some more customization?
Type your name to field and pick orange color again "Add
Sentence Colorization", you will see all messages with your name in it
with orange color in spatial.
Type [GROUP] to field and click on yellow, this time "Add Word colorization" and you will see as:
[GROUP] NameA looted
ItemA
"You have entered" sentence with "Add Word
Customization" will let you see as:
You have entered Kor Vella
Examples can be expanded with your preferences on how much
experience you gained and many possibilities of your profession, what you looted and critical system messages you want to
follow.
Enjoy!
Secret Smuggler's
Handshake
By: tralita_tusnami
This is a macro I was given when in game it makes meeting
another player interesting and kinda fun.
/mood discreet;
/emote Gives %NT the SECRET Smuggler Handshake;
/handshake;
/pause2;
/mood smug;
It can be modified as you see fit for any occasion, such as a
guild meeting:
/mood happy
/emote Gives %NT the ESF GUILD handshake;
/handshake
/pause 2
/mood none
Have fun with it!
Managing
Harvesters
By: KundoJet
Tip for managing Harvesters:
When you drop a harvester, a waypoint to the harvester is
automatically created in your datapad (IF you have
room!). Edit the name of the waypoint to show the resource you're harvesting,
and the date by which you need to have checked the harvester.
This can be the date you think the hopper will be full based on
your BER and the concentration, the date you think you will run out of
power/maintenance, or the date you think the resource will shift out, depending
on which you think will happen first.
It makes it a lot easier to go to your datapad,
show waypoints on all planets, and be able to see there all you harvesters,
with the resource type and the "check by" date clearly labeled.
Thanks to Ka'chi for the idea!
Personal Whispers
By: Warryyr
If you type /whisper>PlayersNameHere
Hi Fuzzball!
You'll whisper "Hi Fuzzball!"
to the player (replace their first name with PlayerNameHere)
that only they can hear.
A dotted-line text box pops up over you that says
"Hi Fuzzball!"
Everyone else in the area sees:
Warryyr whispers to PlayersNameHere.
You will also do a whispering animation.
Speaking of animations while saying something, here's a nifty way
I've mentioned before, to force your character to do an animation without
saying anything in Spatial:
/sing hello
So long as you don't have Novice Entertainer, you'll perform the wave
motion always triggered by saying hello. You will NOT say anything in Spatial.
This is great for crowded gatherings, with a lot of waving and greeting going
on, as it prevents spatial from being spammed with emote statements. Your
character just does the animation. It seems more natural to me, because if I
walk into a place and see some friends, I like the look of just nodding without
having an emote pop up saying "Warryyr nods at JoeShmo." I
just nod. Great for incognito actions by factional players On Leave
If you DO have Novice Entertainer, you get to use a text function
no one else can - /sing - and it makes the text box you type stuff into look
like a scroll! Great for reciting songs and poetry.
And it's something unique to Entertainer.
EDIT: If you just type /whisper Hi Fuzzball!
Everyone around you will see:
Warryyr whispers,
"Hi, Fuzzball!"
If you use the > between /whisper and the player's name, only
you and that person will see what you typed.
Command Strings Made Easy
By: sciguyCO
To see a list of commands starting with a given string, type in
what you know (or guess) is the start of the command, then hit ctrl-shift-tab.
This will list all the slash commands starting with what you had. If only one
command matches, it puts that into the entry line.
So typing "/nex" and hitting
ctrl-shift-tab gets you /nextCraftingStage. Typing
"/alarm" and hitting ctrl-shift-tab gets you:
/alarm
/alarmAddAt
/alarmAddAtRepeat
/alarmAddIn
/alarmAddInRepeat
/alarmRemove
/alarmSnooze
For some commands, you can get useful info by doing "/help
{command}", but most of the more esoteric ones (like /createPrototype)
just come back with "command not found". This usually means that it
isn't a "normal" command, so the help text wasn't put in.
Checking who's
online from your guild
By Ehenn Gek of Eclipse
do a /chatroom
who guild..guildchat to see
who's online on guild. even /alias it.
to get your guild id:
on the "join chat channel" window, select
"SWG", "YourGalaxy",
"Guild", then guildid is the number you see
there. if you see more than one guild id's there, your
guild id is the one that has a "Guildchat" chatroom in it.
Example:
/chatroom who guild.12345.guildchat
("12345" there is the supposed guildchat
id here. replace it with your own guild's id)
Aliasing it:
/alias gwho /chatroom
who guild.12345.guildchat"
then do a:
/gwho
and the results should come up
like this:
Members of this channel:
SWG.Eclipse.bar
SWG.Eclipse.coolplayer
SWG.Eclipse.foo
SWG.Eclipse.leetplayer
SWG.Eclipse.player
SWG.Eclipse.system (this one always
comes up)
SWG.Eclipse.you
--------------------------------------------------------------------------------
Using the /alias command
By: JenTara
Are you tired of typing out /ui action
toolbar blah blah?
Do you talk to people on other servers and are tired of having to type
out something like /tell intrepid.jen'
You can create your own slash commands! Just type /alias followed by your command,
followed by what you want the command to do.
A few examples...
/alias whatup What's
up, %TT?
=
/whatup
= What's up, Jen'tara Rhee? (Assuming I am your target)
/alias dancing /macro dancing
this would run your dancing macro
without having to hotkey it or type out /macro
and finally my favorite...
/alias jentara /tell intrepid.jen'
will let you send me a tell just by
typing
/jentara Hello, how are you today?
=
You tell Intrepid.Jen'
Finally, be careful not to use already established emotes or
commands, as your aliases WILL overwrite the game defaults... IF you need to
delete an alias, then you must close the game, then go into your star wars
folder and find the text file "aliases.txt" and just delete the
aliases you want to get rid of, or if you are really adventurous... add more
manually
Special thanks to furryjackal that originally
told ME of the aliases.
--------------------------------------------------------------------------------
Asteroid Resource
Dealers
Space Mining can be a profitable business...if you know where to
sell your resources. After you fill up your cargo hold, you can travel to
one of the following space stations to sell your asteroid ore. Keep in
mind that asteroid dealers will only buy resources (not sell them) and
different stations will buy resources at different rates.
Asteroid Vendor Space Stations:
Corellia: -206, -5208,
-6748
Dantooine: -7483, 636, 92
Dathomir: -2709, -4335, 5159
Endor: 959, -846, 2598
Lok: -1692, -4270, -5411
Naboo: 2028, -5958, -7040
Tatooine: -5949, 0, 5944
Yavin 4: 6475, -6474, -6481
Getting within
Healing Range, FAST!
This tip comes to us from Fractus ShiningShadow on the Gorath Galaxy:
Have you ever needed to heal a group member fast, only to select
them and find that they are out of range? Medics across the galaxy know what
I'm talking about. Well here's a tip for getting into healing range of any
group member fast:
Using Shift +[# key] is a
great way of selecting your group members or yourself fast.
Followed by the heal of your choice. That's
pretty basic healer stuff. But what if they are out of range and you haven't
any idea where they are, or there is so much visually going on that you can't
find them in the crowd? Well try using the /follow command. Better yet, assign
/follow and /stopfollow actions (CTRL+A) to hotbuttons (F1-F12). Using /follow will automatically
move your character within range the targeted group member. Now try that
heal again, followed with the /stopfollow command or
hot button. Bingo! You've moved into short-range healing or buffing range with
the click of a button. This tip worked before the CU and still works with the
CU. No worries there...
Here's a list of the commands I use, in the order I use them:
Shift +[#]
Selects groupmembers.
/follow Automatically moves you to your target groupmember.
/bactaShot Any short-range healing action can be used here.
/stopfollow
Ends the /follow command, Freeing your
movement.
Rinse and Repeat...
Hoping this helps beat the "out of range blues".
Special thanks to Imortissa, a long lost
friend and my inspiration for becoming a healer, who taught me this tip.
We miss you M'Love.
- - Fractus
Asteroid Mining
Made Easier
When asteroid
mining, the first step is to shoot the main asteroid with your
mining laser until a big chunk breaks off. When that first big chunk breaks
off, the next step is to chase it down and blast it into smaller, mine-able
chunks. To make things easier, target the first big chunk when it breaks off
(by pointing your ship towards the chunk and hitting tab or semi-colon) and set
your ship to follow the asteroid piece as it floats through space. Your ship
will follow it, making it easier to blast it into smaller chunks. It is also
easier to hit the smaller chunks when it finally breaks apart.
Armor Break
The Brawler Profession has a great offensive special ability that
works well both solo and in groups. The ability is called Armor Break. Armor Break is a special ability that is granted at the
Two-Handed IV skill box and acts as a de-buff on an
enemy target.
Armor Break will increase the amount of damage that will be done
to a creature, NPC or player for a short period of time. During combat, use the
Armor Break ability and then follow it up with your strongest damage dealing
move and you will notice a significant increase in damage done to your target.
The Armor Break de-buff will last long enough to get off a few attacks - - it's
not just a 1-2 combo!
While in a group, all of your teammates that land damage while the
enemy is de-buffed will also benefit from the Armor Break effect.
For advanced melee characters, Swordsman Defense I offers Improved
Armor Break and Advanced Armor Break at Swordsman Defense III. At the elite
profession level, the Armor Break de-buff lasts longer
and your opponent will take more damage.
Stopping Shot
The Pistoleer profession has a useful
ability called, "Stopping Shot". Stopping Shot is a special ability
that is a ranged attack against an opponent's legs and feet that has the
ability to stop their forward movement for a very short time however very
little damage is usually done.
This is a very useful ability to have either as part of
professions or as a helpful member in a group because it "roots" or
"stops" an opponent in their tracks for a short period of time.
he Pistoleer
simply has to fire his Stopping Shot attack on an enemy. The group will know it
was successful because they will all see fly-away text that reads +Rooted+ and
also an animation of red rings around the legs and feet of the target. Once
this combat message has been seen, it's time to let loose and do as much damage
as possible for the duration of the rooting ability. If you have a melee combatant
in your group, it is also helpful to root and enemy so they don't have to run
very far and can do the maximum amount of damage.
Squad Leader: Volleyfire
Improve your group's combat ability and join up with a Squad
Leader! Squad Leaders have a special ability called volleyfire
that will give a 15% bonus to accuracy and damage to everyone in the group. Volleyfire not only gives a group bonus, but it will also
"paint a target" that everyone in the group can see in order to
direct their fire at a single target.
To make this happen, the Squad Leader needs to be the group leader
and target an enemy. Once the Squad Leader is both the group leader and targets
an enemy, they can activate their volleyfire icon and
everyone will see the group target and get the volleyfire
bonus.
Pass-Through
Assisting
When a group member is in a tough combat situation, there is an
easy way to help them out.
Simply target your group member and attack!
Any attack you execute will "pass through" your
group-mate and on to strike your group-mate's target. The pass-through assist
does require for your group member to have something targeted.
For example, I am in a group with Virrago
and GarVa
. GarVa comes under heavy attack by a group of
creatures. For Virrago and me to "assist" GarVa, GarVa needs to target one
of his enemies. Once GarVa has an enemy targeted, we
simply need to target GarVa and attack. As a result,
all of our attacks will "pass through" GarVa
and hit whomever (or whatever) GarVa has targeted.
Center of Being is a great special ability for melee characters and using it
successfully will have a huge impact on winning melee combat.
How to get it
All Brawlers can earn the
How it works
To effectively use the
Using the Center of
Being ability this way will give a melee character much better
defenses in combat. Not only will it reduce the number of hits, but also
the amount of damage for each hit during the attack.
Game Options
New players and veterans alike don't always take advantage of the
"Game Options" menu on the launchpad. Once
you log into the game, the "Game Options" button will become
available and there are 6 tabs of options that can be very useful.
Tab 1 - Information
This tab lists all the information about your computer including
your drivers, memory and other useful technical references. There is also a a button so you can quickly copy
this information to the clipboard.
Tab 2 - Graphics
This tab contains a host of graphics options that can be helpful
including the ability to run the game in a windowed mode (though it takes a lot
of system resources to do that), along with a variety of rendering options.
Tab 3 - Sound
This tab can allow you to enable and disable your audio as well as
choose the source for game sound. This is especially helpful for musicians and
technophiles out there with more than one sound card.
Tab 4 - Game
The game tab has a checkbox for those that want to turn off the
opening animation sequence as well as a drop down window for choice of
joysticks and language options.
Tab 5 - Advanced
The advanced tab does indeed have advanced options, but in
particular, if you check "Disable World Preloading", you can increase
the performance of the game on some computers.
Tab 6 - Debug
This can be an especially helpful tab if you are having technical
difficulties. Click the "configure" button to change the options.
There are options for crash logs, character ID, hardware information and even a
flag so that it makes it easy for you to flag yourself for customer service and
tech support to contact you. Lastly, there is even a button so that you can
easily reset all of your in-game options if you need to.
Cross Game Email!
You can send in-game email messages to your friends on other servers, or to
those who play EverQuest or Everquest
2.
- To send
mail to someone an EQ2 server, enter the name as
eq2.servername.charactername
- To send
mail to a friend playing EQ, enter the name as eq.servername.charactername
Your friends who play in EQ or EQ2 can send you mail too!
- To send
mail to a friend in SWG, they should enter the name as swg.servername.charactername
Disabling Ship Reactors
There are several different mission types in Jump to Lightspeed. For many of the missions, the main
objective is simply to destroy enemy ships. There are other types of
missions however where the primary objective is to inspect a ship or other type
of activity.
If you need to disable a ship without destroying it, you can
target specific components on an enemy ship. To do this, you use the
targeting commands for, "Cycle Component Forward" and "Cycle
Component Backward". Simply target a key component and blast
it! This technique of disabling ships is also handy if you get ambushed
by powerful enemy ships. If you can take out their reactor (or weapons),
you might be able to make a getaway!
These targeting commands start out bound to the following
keys:
- Cycle Component
Forward: ]
- Cycle Component
Backward: [
Target an enemy ship then use either of these keys to cycle
through the various components on an enemy ship. The name of the
component will appear in the targeting window. Cycle through the
components to target the specific one you want to disable. This could be
the reactor, weapons, engine, etc.
To make this even easier to accomplish in combat, you can
re-map these keys to something you prefer or if you have a joystick, you can
re-map the "Cycle Component Forward / Backward" to a joystick button
for fast action.
You can re-map this (or any command) by:
• Open your Options window (CTRL-O)
• Press the Controls Button on the Left
• Click the "Target" tab to find all of your targeting options
• Find the option you want to remap and click, "Rebind"
• Click the button you want to use and then click "ok"
• Click the "Apply" Button and then "Done"
Do you have a useful tip that you want to share with your
fellow Star Wars Galaxies players?
Programming
Fireworks Displays
"Many players know how to load different fireworks into
a Show Package and launch it for an impressive display. However it's a little
known ability of the Entertainer profession to program these packages. Anyone
with Novice Entertainer can adjust the timing and order of the fireworks,
creating dramatic pauses, colorful clusters, or long steady displays. A
programmed package can then be given to anyone else, and launched as normal.
It's a great way to celebrate a special ingame
occasion."
Changing the
Color of the Musician and Dancer Flares
It is possible for Musicians and Dancers to change the color of their special
effects (skill tree 4/0/0/0 in each profession). To do so you can
activate any of the abilities listed below - - provided the necessary
requirements are met - - with a 1, 2 or 3 as an added parameter.
This will change the color/style or general flare of the special effect.
For Example: instead of typing /dazzle, type /dazzle 3
The following abilities can have different colors:
Dancer:
/colorlights
/dazzle
/spotlight
/distract
/smokebomb
Musician:
/colorlights
/dazzle
/spotlight
/firejet
/ventriloquism
New Double Click Actions:
On February 4th, we
showcased a user interface layout that wasn't dependant on using the
"Alt" key. We have currently added some new
features to the modeless interface. These are the new "Double Click
Actions".
The way to execute the default action on an object in the
SWG is to double click the left mouse button while hover the mouse over the
object. This makes performing frequent actions easier than always having to
select them from a menu of several options. We are updating default game
actions to make game play easier for the player by making some pretty common
actions more quick and easy to access. This is not to say they are the only way
to access these functions, but just a shortcut to them using the mouse.
- If you can talk to
an NPC, it is attackable, and it is not incapacitated, a conversation is
requested instead of attacking the target (and subsequently blowing your
mission).
- If the target is an
enemy and is incapacitated, a double click on the target performs a death
blow.
- If the player is on
their mount, double clicking on the mount dismounts them.
- If the player double
clicks a vehicle or a pet, it attempts to mount them.
- If you can pick up the an object in the game, double clicking picks up
that item.
- When you
double-click on a crafting station, a compatible crafting tool is
booted.
In addition to the Double-Click
actions, the newly added default actions include:
- Single left-click
selects object when the button is released.
- Double left-click
now selects object and causes default action.
- Single right-click
selects object and brings up the context menu when the button is released.
- Pressing a mouse
button down in the scene to move the camera no longer deselects the
object; however, by default, clicking quickly in the scene will deselect
the current target.
Keep Track Of
Those Resources
"It's easy to keep track of which resources are new and which ones are
soon to disappear ! Simply open your
surveying device each day or two and take screen shots of all the resource
types you might be interested in. When you need to move your harvesters,
compare the current resources with your screen shots and its easy to see which
ones are new and likely to be around a while and which ones are soon to
disappear."
Keeping Behind Enemy Ships
Having trouble keeping behind enemy ships? If a ship keeps
flying past you, turning, and zooming by you before you can shoot it again,
just hit the “end” key , and half a second later hit the “home” key to return
your ship to full speed. During this interval of deceleration and acceleration,
you will have a much smaller turn radius, allowing you to get back on your
target’s tail.
To get things started:
If you change your Mouse Inertia to a setting between 3-4, you will get a snappier feel to gameplay. Here's how you can do it:
1. Press CTRL-O to open your "Options" window.
2. Press the "Controls" button on the left side of
the window
3. You will see a slider titled, "Game Mouse Dead Zone
Inertia" Fly your cursor over the slider and you will see a tool tip
that will give you the exact number the mouse inertia is set to.
4. Click "Done"
How to Cut
And Paste in-game:
Do you want to be able to "Cut and Paste" from outside
the game and get it to your /notepad?
Or how about your /notepad to a word processor out of game?
Or how about from your notepad into your chat window?
Here's how to do it:
1. Under the chat tab, there are three commands that you will want
to re-bind:
-
Chat Edit Copy
-
Chat Edit Cut
-
Chat Edit Paste
2. Assign your Copy, Cut and Paste commands:
1. Open
your "Options" window by pressing CTRL-O
2. Press
the "Controls" button on the left
3. Press
the "Keymap" button on the bottom of the
Controls Option window
4. Click
the tab that says, "chat" in the Keymap Window
5. For each
of the commends (Chat Edit Copy, Chat Edit Cut and
Chat Edit Paste):
- Select
the item in the list by clicking on it with your mouse
- Click
the "Rebind" button
- Press
the keys you want to use to assign to the button. A good selection
to use for these commands is:
A handy set of keys to use is:
Chat Edit Copy = CTRL+SHIFT+C
Chat Edit Cut = CTRL+SHIFT+X
Chat Edit Paste = CTRL+SHIFT+V
3. Click "Ok"
4. Click "Apply"
Getting
a list of Slash Commands
If you ever need a full list of slash commands, simply type // and enter into
the chat window and you will get a full list of slash commands.
What tip do you have that you can
share?
Finding an Entertainer
One way that you can find an Entertainer now is with the planetary
map. Entertainers can register at
cantinas to let other players know they are there and ready to entertain
you. You can find out which cantinas
have registered entertainers this way:
1. Open your Planetary Map (CTRL-V).
2. Look for "Cantinas" on the list
3. Double click "Cantinas" to get the full list of
cantinas.
4. Any cantina that has a registered Entertainer next to it will
have a sun symbol next to the cantina.
Then all you have to do is make a waypoint and head on down to the
watering hole of your choice and sit down for a drink and a dance!
Droid Storage Access made easy:
If you have a droid with storage
capacity, you don't have to use the radial menu to put stuff into the droid
when it's out. Simply drag the object over the droid and if there is room
in its storage bin, it will take the object in and keep it for you. You
still have to open the storage window to get it back out though.
One of the little things that new
players not know of and that veterans may overlook from time to time is the
handy notepad.
Type /notepad and you will
pull up a notepad that will save your notes. You can save plans for a
player event, jot down bazaar notes and information, reminders of things to go
back and check into and all sorts of things.
Change in and out of Armor and Outfits with 1 button:
Are you ready to head into battle or maybe a Wedding? Do you have a favorite suit of armor or
clothing you like to wear? Well, here is
how to switch your sets of wearables with one button
on your toolbar:
1. The first thing you will need to do is choose a toolbar pane.
The toolbar is meant to be an easy
method for performing virtually any action quickly and efficiently. Each box on
the toolbar corresponds to one of your Function keys (F1- F12 ). You can click on virtually any
icon, action, or piece of equipment; and then drag it into the toolbar to
assign it to a Function key. Cycle between toolbar banks
using the toolbar arrows or the CTRL+ ` keys.
You have access to 6 toolbars (numbered 0- 5). You can drag the
edges of the toolbar pane to expand the toolbar to two rows. The second row can
be utilized by hitting the SHIFT key and the corresponding Function
key. (Don't forget to pull your toolbar down
and double the amount of available buttons ![]()
2. The next step is to open your inventory and click-and-drag
your armor or outfit items that you want to be able to change into and put them
on the toolbar slots on the toolbar pane.
3. Next, open your Abilities window CTRL-A.
4. Click the "Macro" tab in your abilities window.
5. In the Abilities, New Macro window, choose a name for your
action. (I titled mine, "SuitUp")
6. In the Abilities, New Macro window, choose a Toolbar Button
for your action
7. In the Abilities, New Macro window,
set up your macro text:
a. The first command
is /ui action toolbarPane01;
·
This switches the toolbar pane to the second available pane or toolbar
pane 01.
·
The word "Pane" in toolbarPane
must be capitalized.
·
There are six toolbar panes numbered 0-5. The command will access whichever toolbar you
put at the end of the command.
·
Toolbar
Pane 00 is your default toolbar pane
·
There
must be a single space in between the words, "/ui"
and "action" and also between "action" and
"toolbarPane01"
Toolbar Pane Numbers:
Toolbar Pane 1 = toolbarPane00
Toolbar Pane 2 = toolbarPane01
Toolbar Pane 3 = toolbarPane02
Toolbar Pane 4 = toolbarPane03
Toolbar Pane 5 = toolbarPane04
Toolbar Pane 6 = toolbarPane05
b. The second
command is /ui action toolbarSlot00;
·
Toolbar
Slots are the various buttons on each toolbar
·
There
must be a single space in between the words, "/ui"
and "action" and also between "action" and
"toolbarSlot00"
·
The word "Slot" in toolbarSlot
must be capitalized
·
Repeat
this command in order, depending on which slots on the toolbar you have a
wearable item in. For instance, If you
had a shirt in the first slot, pants in the second slot and shoes in the third
slot, you would need to to have a /ui action toolbarSlot command for
slots 00, 01 and 02.
Toolbar Slot Numbers:
00 = Top row of toolbar slots, first button
from the left.
01 = Top row of toolbar slots, second button from the left.
02 = Top row of toolbar slots, third button from the left.
03 = Top row of toolbar slots, fourth button from the left.
04 = Top row of toolbar slots, fifth button from the left.
05 = Top row of toolbar slots, sixth button from the left.
06 = Top row of toolbar slots, seventh button from the left.
07 = Top row of toolbar slots, eigth button from the
left.
08 = Top row of toolbar slots, ninth button from the left.
09 = Top row of toolbar slots, tenth button from the left.
10 = Top row of toolbar slots, eleventh button from the left.
11 = Top row of toolbar slots, twelfth button from the left.
12 = Bottom row of toolbar slots, first button from the left.
13 = Bottom row of toolbar slots, second button from the left.
14 = Bottom row of toolbar slots, third button from the left.
15 = Bottom row of toolbar slots, fourth button from the left.
16 = Bottom row of toolbar slots, fifth button from the left.
17 = Bottom row of toolbar slots, sixth button from the left.
18 = Bottom row of toolbar slots, seventh button from the left.
19 = Bottom row of toolbar slots, eigth button from
the left.
20 = Bottom row of toolbar slots, ninth button from the left.
21 = Bottom row of toolbar slots, tenth button from the left.
22 = Bottom row of toolbar slots, eleventh button from the left.
23 = Bottom row of toolbar slots, twelfth button from the left.
c. The last command is /ui
action toolbarSlot00;
·
This button simply returns your toolbar pane to its default location.
·
There
must be a single space in between the words, "/ui"
and "action" and also between "action" and
"toolbarPane00"
A completed list of commands to change your shirt, pants and shoes
might look like this:
/ui action
toolbarPane01;
/ui action
toolbarSlot00;
/ui action
toolbarSlot01;
/ui action
toolbarSlot02;
/ui action
toolbarPane01;
Basically, what this does is switches the toolbar, clicks each of
the buttons you listed in the macros and then switches it back to the default
toolbar.
This is handy for suiting up your armor or switching from street
clothes to your pilot suit. Another neat
trick for entertainers is to add their theatrical puff of smoke in the line
commands so that they do a quick change with a...well...a theatrical *poof* of
smoke.
Landing at the Emperor's Retreat
- Finding the Starship Terminal: Go in the entrance to the Imperial Retreat and
run across to the door directly across from the entrance, past the
elevator (be sure to wave or salute to the Imperial Guards as you go
by). Go through the door and take a
right (because you have to, it’s the only way to go). As you go down the hallway, take another
left and then take the first left after that. There is a room on the left with
starship terminals at location
+2387, -3930
- Landing at the Emperor's Retreat: Players of the Imperial Inquisition Squadron or RSF pilot tracks
that have completed Tier 1 can do a space quest to get access to the Emperor's
retreat without doing the ground Theme park missions. The space station that will give you
access is:
Naboo
Space Station
Type: Station
Location: -2491 905
-6460
Home of the Royal Security Forces, the space station can provide emergency
repairs or clear travelers to land at any of Naboo's
star ports.
- Quest Details:
"Naboo system: Rescue the freighter"
The station says,
"A loyal pilot... and just in time too! We need your help, stat,
pilot!"
The player asks,
"What's the emergency?"
The station
replies, "An Imperial freighter is under attack by the Rebel filth and
needs help right away, but I can't seem to get in touch with the Imperial space
station."
If the player
replies, "I'll save that freighter!" then he will be granted the
"Rescue the Freighter" mission. Completing that mission series will
give the player access to land at the Emperor's Retreat, and access to enter
the retreat.
Getting the most out of your Space Zone Map
Your "Space Zone Map" is accessible by the default keys and acts similarly
to the planetary map, giving location information for places and objects in the
sector of space you currently occupy. It
is a three dimensional map of the space zone with a range of extra controls
that allow you to manipulate the viewable map.
- Zone
Map Macro Button
The first part of the tip is that you can make a macro button to access
the map easily:
1. Press CTRL-"A" to open your "Abilities" window
2. Click the "Macro" tab
3. Click the "New Macro" button
In the macro button window:
- Name it ZoneMap
- Pick an Icon
- For the macro
text, type: /zonemap
4. Click Ok.
5. Drag and Drop your icon from the Abilities Window to your toolbar.
- Zone
Map Controls
Basic Controls
These basic controls move the camera "inside" the zone map like
this:
Left Mouse Button: Pan camera around "inside"
zone
CTRL+ Left Mouse
Button – Rotate camera
CTRL+Mousewheel – Camera Zoom
Slider under Zone
Map Window - Camera
Zoom
Reset View – This centers the camera on your ship
Show - There are 8 items you can toggle on
and off by clicking these radio buttons:
Different Items
Include:
- Asteroids
- Nebula
- Hyperspace Points
- Space Stations
- Waypoints
- Player Location
- Player Names
The neat thing about the Zone Map is that you can double click on the
menu items on the right hand side to reposition the camera around the zone on
the fly. This allows for an easy
"browsing" of what is in the zone.
Also, by right-clicking on the menu items, you can easily select the
options of "Make Waypoint" and "Autopilot to location".
If you forget any of this while you are in game, click the "Show
Help" radio button and the tool tip windows will go over the basics with
you at any time.
Adding color to your SWG Bio
Here is a great tip not only for adding color to your SWG
biography, but also enable your ability to have "cut-and-paste"
in-game for use with your notepad and other sorts of things.
To add color to your SWG bio, the first thing you have to do is
enable your cut-n-paste commands. The
second thing you have to do is add the HTML color tag to your bio outside of
the game and then paste the whole thing in your Character Sheet. Here's the step-by-step:
1. Enable your Cut-N-Paste Commands
- Press CTRL-O to bring up your Options window
- Press the "Controls" button in the Option window
- Press the "Keymap" button on
the Controls
- Click the Tab that says "Chat"
- Under the chat tab, there are three commands that you will want to
bind:
Chat Edit Copy
Chat Edit Cut
Chat Edit Paste
·
One at a
time:
o
Select
the item in the list by clicking on it with your mouse
o
Click the
"Rebind" button
o
Press the
keys you want to use to assign to the button.
A good selection to use for these commands is:
§
Chat Edit
Copy: CTRL+SHIFT+C
§
Chat Edit
Cut: CTRL+SHIFT+X
§
Chat Edit
Paste: CTRL+SHIFT+V
o
Click
"Ok"
o
Click
"Apply"
Now you are done with the first part. What you have done is enable your cut-n-paste
commands. Next is actually changing your
bio.
2. Changing the color in your SWG Bio:
·
Open up
your Character Sheet Bio by Pressing "CTRL-P"
·
Next, click on the "Character" Tab.
·
Select
your bio text with the mouse and press CTRL+SHIFT+C (This puts the text on your
windows clipboard).
·
Once you have done that, press ALT-TAB and minimize your game.
·
Load up a
text editing program such as Notepad, Wordpad or Text
Pad.
·
To change the colors of the text, use the following command:
\#FF1234\This is my bio text....
Reference any HTML color list to select from a
wide variety of colors.
·
Once your
have chosen a color and completed your SWG bio in the text editor, you need to
send it to your clipboard. Press CTRL-A
(to select all the text) and then CTRL-C to copy the text to the clipboard.
·
Press
ALT-Tab and open up your game window.
·
Put the
mouse in your character sheet bio window (make sure you see the cursor)
·
Click
CTRL+SHIFT+V (or whatever you assigned as your Chat Edit Paste command
Then click "Done" to save the data. Type CTRL+1 to
select your character and type /examine to view your own bio in all of the
colors you wanted.
VOILA! A
bio with color.
Find out how much time
you have logged as a Veteran
- We have added a new slash command so that you
can find out how many "days of entitlement" you have, that is to
say, how many days you have accumulated as a veteran.
Type /GetVeteranRewardTime and you will receive a system
message that will tell you how many days you have accumulated.
Re-mapping the Alt Key
This is my favorite
tip and it literally changed my gameplay. Re-mapping your ALT key to the Mouse Wheel
can be very handy. (If you don’t have a
mouse with a mouse wheel, then my second tip is to go get a mouse with a wheel ![]() )
)
1. Open your
Options Window (Ctrl-O)
2. Click the
“Controls” button on the left of the options window
3. Click the button
that says, “Keymap”
4. Press the keymap tab that says “UI”
5. Scroll down
until you see the option for “Toggle Mouse Mode” and select it
6. Click the
“Rebind” button
7. Click your mousewheel button.
You’ll know it worked because it will say “mousebutton2” in the re-bind
window.
8. Click “ok”
9. Click the
“Apply” button
10. Click “ok” and
“Done”
Now, whenever you
want to shift between your user interface modes, all
you have to do is click your mousewheel.
If you are
working on the
Moving Furniture
Made Easy
Moving furniture with the radial menu is an ok place to start, but
when you find yourself wanting a finer touch to fixing up your house, shop or
other type of personal space, you really need a better way to easily move
things around.
Try this set of macros to make things easy and fun:
· Move your tool bar to one of the layers you don’t use a lot. (Toolbar level #3 or 4 works well and stays
out of the way).
· Press ctrl-A to pull up your “Abilities” window
· Select the “Macro” tab
· Press the “New macro" Button
· In the box where it says,
“Macro Text”, add your movement. For
example:
o /rotatefurniture left 5
o /rotatefurniture left 45
o /rotatefurniture left 90
o /rotatefurniture left 180
o /move forward 20
o /move forward 10
o /move forward 5
o /move forward 1
o /move back 20
o /move back 10
o /move back 5
o /move back 1
o /movefurniture up 10
o /movefurniture down 10
o /movefurniture up 5
o /movefurniture down 5
o /movefurniture up 1
o /movefurniture down 1
· Name it in the name window.
· Pick an icon and add it to the list.
· Then drag the icon to the tool bar and
moving things become much easier by using the customized buttons you just made.
Remember that wherever your avatar is
pointing is "forward". Then
simply target the item or piece of furniture you want to place, and press the
toolbar buttons to get it onto place just how you would like it.
Getting Involved with Live Events
Lately, I've seen a lot of posts commenting on Live Events and
folks not knowing how to get involved.
Today's Tuesday Tip is a list of ways to find, start and getting
involved the Live Events run by other players.
- In-Game Access To
Schedule: If
you are in game and want to see what the Live Events schedule of events
run by players:
- Click CTRL-H to pull up your Holocron.
- Click the Customer Service
Button
- When the CS window comes up,
type "Player Events" in the "string" prompt and you
will see a list of player run events.
We update this every Monday, Wednesday and Friday.
- From the Web: Go to the front page of our
official web site and under the Community
section, you will see a link called, "Current Events".
The Current
Events portion of the web site is updated with player
events on Monday, Wednesday and Friday.
- Galaxy Forums: There are also "sticky
threads" in each of the Galaxy
forums where players can post their events.
- Events Forum: We also have an Events
Forum where our Live Events team will post events, puzzles
and other sorts of event oriented material.
Screen Shake Toggle
One of the big player requests for a long time
was to stop the screen from shaking!
There are various events in game like big creatures hitting the ground
and other sorts of ground shaking events that...well...make the screen shake.
There are many of you that wanted the ability to
turn the screen shake off and now you can!
·
Open up
your Options Window (Ctrl-O)
·
Press the
"Misc" button on the left hand side of the
window
·
There, you will find a check box titled, "Screen Shake"
It's "on" by default, but if you want
the shaking to stop, just un-check the box and you will
shake no more!
Weapon Decay
Weapons decay with usage; each time you
use it, the item decays. When the
condition of the weapon reaches 25% of the item's maximum total condition, the
weapon’s minimum and maximum damage starts to decay. The item reaches a decay threshold at the 25%
mark.
For every 1% below the 25% condition
threshold, the weapon’s minimum and maximum damage is decreased by
1%. This usage decay will drop a
weapon's effectiveness down to 0.
What you can do when your weapon
reaches 25% is to "roll the dice" and try to repair your weapon. It's a long shot, but it is a chance to get
your weapon repaired. A weapon repair kit
is an old fashioned dice roll chance to repair your weapon. If you "get a
good dice roll" and repair a weapon (or have it repaired for you) back
above the 25% threshold, the weapon’s initial min/max damage is restored. For smugglers, slicing in no way effects the
rate at which a weapon decays, but a sliced weapon will make the
weapon repair even chancier than it already is.
Weaponsmiths have a slightly greater chance of
repairing a weapon than other professions.
Additionally, trying to repair a weapon with less than 25% gets more and
more risky with each percentage point and will probably destroy the weapon
outright.
Sharing Waypoints
Waypoints are useful for finding POI’s,
marking favorite locations or even your own structures and equipment, but have
you ever wanted to get a friend to meet you at your house? Have you ever needed to tell a possible
customer where your main shop is? How
about tried to plan a raid and invite someone new to come join you? Well there are a few ways you can share
waypoints:
Slash Command
If you’re chatting with someone and you want to meet someplace,
you can instantly create a waypoint by using the slash command. Simply type:
/waypoint x y
(X is the first number on your radar to the left and y is to the
right.)
e-mail attachment
You can also use the in-game email system to share one or more
locations. This is handy for telling
customers where your new store is, planning raids and other group
activities. You can do this by:
1. Create a new waypoint in your datapad.
2. Pull up your mail window (CTRL-E) and open up a new mail
message.
3. Click and drag the waypoint into the mail window and drop it in
the little box in the lower right titled, “Attachments”.
Option: If you want to share the waypoint with lots of friends,
you can send the mail to a few friends by separating each name with a
semicolon, like this: JustG, Keldarin;
GarVa;
4. Click send and you’re done.
For
business people
If you own a business or run a service and want to share a
waypoint with a client/prospective customer, visit a Droid Engineer and check
into getting yourself a merchant module!
The merchant module enables a droid to play
back a recorded message and give out waypoints by request.
Crafting Inventory Control
In Publish 10, there is a handy new option for crafters. A new feature has been added to the options
window to help organize and reference resources. Open up your options menu by
pressing Ctrl-O and then the Interface button. Scroll to the bottom of the
window and you will find a list of crafting values. By checking the
corresponding box, your inventory will now display the number of your choice on
your resources.
Not only will it display your choice resource value, but it will
also display the average value of
all the checked boxes. For instance, if you wanted to see the average of a
resource’s resistances, you would check the boxes marked,
Entangle Resistance, Cold Resistance, Decay Resistance, Heat Resistance and
Shock Resistance and when you open up your inventory, the resource will display
a little yellow number that will be the average of all those numbers.
Now with a glance, you can open your inventory and check get an inventory average value for the following
resource values:
- Entangle Resistance
- Cold Resistance
- Conductivity
- Decay Resistance
- Flavor
- Heat Resistance
- Malleability
- Potential Energy
- Overall Quality
- Shock Resistance
- Unit Toughness
Combat Positions
If you are having trouble killing a target at range, change position to
kneeling or prone (lying down) and you will improve your accuracy. But on
the down side.... once they get closer you are more vunerable
to melee attacks.
Placing player structures:
- Most building placements start
with the main building’s door facing North. You can use either Page-Up and
Page-Down to rotate the building, or if you prefer, use the right mouse
button to rotate the building to suit your tastes. If you decide you don’t like the
position of the building and you want to try to re-place the structure,
use ESC to cancel placement.
Manage
your SWG Mail!
There is a
“save mail” command that will save your in-game email to your hard drive. This is handy if you are a crafter with a lot
of email or a player who runs a lot of events and has to manage a lot of email.
In-game,
simply type:
/mailsave
After you
enter the command, the computer will prompt you to wait for a moment while it
saves the mail to your hard drive. When
it is complete, it will give you a message in your chat window that notifies
you what directory the mail has been saved to.
Then, later on, you can access the mail by using the explorer to browse
to the following sample directory:
"C:/Program Files/StarWarsGalaxies/profiles-Your station name/galaxy
you play on/mail_your character name"
Inside the
last folder will be all of your mail saved as a *.mail file.
If you have
never opened a *.mail file, your computer will ask you to find a program to
open the file with after you double-click the file. You can use a text notepad to read the files.
Also note
that in the same window, there will be a checkbox asking you if you ALWAYS want
to open the mail files with a notepad or other type text program. If you choose, “yes”, you will be able to
double-click on any mail in your mail directory to open it with your notepad. If you choose “no”, you will have to browse
for the application to open the mail file each time you double click on the
file.
Make sure to
choose what works best for you.
Visual Tip: If you are
fighting creatures that are particularly tall such as rancor or pickets, try
going into the options window (Ctrl-O), click on the “Graphics” button and
slide up the "Field of View" slider. This will let you see a
much greater area and manipulate the camera to a much higher altitude.
Boarding Tip: You can use /bo
trans at the starport ticket terminal to jump right
on the shuttle and save that precious run back or avoid having to try and
double click on ol’ silver britches in a busy Coronet
starport.
Droid
Handling
You can program droid names and commands very quickly by setting up
macros and then dragging those to one of your toolbar slots.
Example:
·
Create a
new Macro ("Droid-Store") and in the body, type: "/tellpet Store;"
·
Drag this
newly made macro icon to your UI Toolbar (since you'll want it there anyway).
·
Call the
droid and select "Program", then "Store"
·
Hit the UI Toolbar button for the "Droid-Store" macro you
made and that command is programmed.
·
Repeat
for other droid commands.
Once you set this up, you should be able to
both name and fully program a droid's command in a mere matter of a few moments.
Getting the most out of your visits to a
Vendor
- Resizing
Columns: If you are browsing for an item on a list of products that
all have long descriptions, you can resize the columns so that the entire
description is viewable. Simply
hover your cursor over the top part of the list, in-between the two
columns. You’ll know your cursor is
in the correct location when the cursor changes to a side-to-side arrow
<--->. When you see the
side-to-side arrow, click and drag the column size to fit the descriptions
you are trying to read.
- Next
Items: A vendor will only list 100 items per page, but sometimes
there are more than 100 items on the vendor. To browse those items, press the “Next
Items” button and it will list the next page of 100 items available on the
vendor.
- Offer/Available
Items: If you want to transact business with a merchant, you may
offer items to a vendor that may be made available or retrieved by you or
the merchant at a later date. It is
important to note that when using the offer/available items feature on a
vendor that this is not a
secure transaction. For items you
prize as highly valuable, you should always use the secure trade feature
if you are going to sell your rare and valuable items.
You can use your
mouse to grab a chat channel tab and drag it from the chat box to create a new
window. Cycle through the chat channel tabs with CTRL HOME
and CTRL END.
Tomorrow, we will be releasing
Publish 9.1 with two new default chat channels, a planet-wide Auction channel
for wheeling and dealing and a current Planet channel to help find groups,
entertainers, medics, help and other services or for announcing events. We also
fixed user-created chat channels to be persistent. See the Online Manual for more info on Chat Channels.
Remember you have two tools for
blocking spam. The first is the new option for ignoring all AFK messages and
the second is the /addignore command for specific people who are annoying you.
When you use
certain smileys in your text chat, your avatar will
automatically perform animations based on the smiley (if there is one). It will
only detect the last emoticon in the line.
beam ![]() =D
=D
blush *^_^* *o_o*
*O_O* :")
cry ![]() (
:'( :,( ='( =,(
(
:'( :,( ='( =,(
curse >![]() >
>![]()
eek 8o
evilgrin >![]() >=) (6)
>=) (6)
eyebrow -_^ ^_- o_^ ^_o O_^ ^_O
frown ![]() =(
=(
fume ![]() >=(
>=(
gape ![]() =O
=O
grin :> =>
groan :/ =/
halo o![]() O
O![]() o=) O=) (a) (A)
o=) O=) (a) (A)
kiss :x :X :*
laugh ![]() )
)
love (L)
nausea :& :-&
(&![]()
no (N)
ponder .oO
rose -<@ @>- (F)
shush :$ :-$
smile ![]() =)
=)
smirk ![]() =|
=|
snarl :[ =[
snore |) |-)
steam x( X( :@
surprised ![]() =o
=o
tongue ![]()
![]() :b =P =p =b
:b =P =p =b
yes (Y)
New as of today's publish
,
you can filter out chat from /afk players if you
desire. Simply go into the Options Window (CTRL O by default), select the Chat tab and uncheck the Show Chat
from AFK Players box.
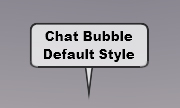
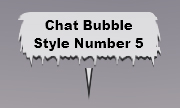
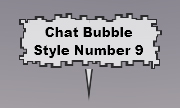
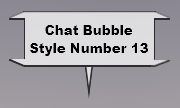
You can change
the style of the chat bubble
by using different say commands
like /huff (style 5), /jabber (style 9) and /threaten (style 13). Go to the Online Manual - Chapter 19.4 to see all of the chat
commands.
Some
tasks will
have their difficulty based on the weapon you are currently equiped
with. If this is not the weapon you plan to use you will want to unequip it and equip the weapon you will use to get a
mission of appropriate difficulty
If you auto-run,
remember you can hold down
the SHIFT key to temporarily slow down to walking speed (or speed up if
you auto-walk by default). This is particularly useful when speeding through
cities on swoops; it is much easier to navigate if you shift down around the
corners. ![]()
If you hold down CTRL and roll your mouse wheel while in any
inventory or chat channel, the size the items
or font will enlarge or shrink, making it easier for you to manage
them.
Right
click on the waypoint monitor and you can select waypoints to activate or deactive without going into the datapad.
You can turn the waypoint monitor on and off in the Options window (CTRL O by
default) under the Misc tab.
You
can send tells to mulitple people at once by putting
a comma between names (no spaces). For example, /tell GarVa,Pex,Thunderheart Hello! will send a separate tell to each of them. For
game mails, use a semicolon to separate the names.
You can use many variables when typing or in a macro, here is a
list of the available variables:
%KU - your profession title
%KT - your target's profession title
%NU - your first name
%NT - your target's short version name (first only)
%OT - him/her/it for your target
%OU - personal objective pronoun: him/her/it for the speaker
%PU - possessive: his/her/its for the speaker
%PT - his/her/its for your target
%RU - your species
%RT - your target's species
%SU - personal subjective pronoun: he/she/it for the speaker
%ST - he/she/it for the target
%TU - your full name (first and last)
%TT - your current look at target target's full name
Want to transfer group leadership to
another player (preferably a Squad Leader)? Just target or select
that group member and type /makeleader.
With today's publish, anyone can use the
droid customization tool and the colors last longer. Droid Engineers do
get more options with the tool though. Have fun!
Here's a trick for matching colors to existing customer armor or
clothing while crafting: Use /examine on your customer when they equip the
item. This view shows the true colors without being affected by
directional lights or shadows.
Since the Corellian Corvette is opening
today (currently on live in the US, be on live a little later on the European
galaxies during their normal downtime), be sure to check out the other
adventure areas like the geonosian bio-lab and
warrens. They should be less busy now...
You can disable the intro movie by going to the Launchpad Options (button on the update screen) and then to
the "Game" tab.
In
the Options window (CTRL O by Default) on the AFK
tab, you can change the time it takes to automatically go "AFK" and
the message that other people get when they send you tells while you are away
from the keyboard.
Bewarned, it isn't aways safe to go AFK in highly
public spaces. I've seen AFK players wiped out during a recent droid invasion.
The Events Team doesn't intentionally target AFK players, but the NPC droids
sometimes have a mind of their own over where they will go and whom they will
attack.
There
are many slash commands. An easy way to reference all the available slash
commands is by typing // and in the Spatial Chat window. A full list of
all slash commands will be displayed in alphabetical order.
DigiDante typed up the list for us here: Link
SirLestat typed up a UI Action list for us here...
As
requested, you can now move items vertically in your player structures with the /moveFurniture UP (1-500) and /moveFurniture DOWN (1-500) commands!
There
are many commands that don't have key commands by default. Open your Options Window (CTRL O by
default), click on the Controls tab,
press the Keymap button and explore the various fields. Personally,
I set key commands for things like UI-Help (Knowledge Base), UI-Chat Room
Browser, Chat-Chat Edit Copy, Chat-Chat Edit Cut, Chat-Chat Edit Paste, and
several of the Custom macros I made (for example, I've changed /t to reference
a custom macro /earthTime instead
of the default /tell).
Type
/emote to displays whatever text you follow it
with as an action of your character. For example, if your name is Laine and you type "/emote loves Tatooine."
then "Laine loves Tatooine."
will be seen by everyone in your area.
You
can save all your mail to read later with the /mailsave command. You can read the .mail files off-line
by opening them with a text program like Notepad.
The
Inventory Window (default CTRL I) shows
item attributes in the the left hand window now.
Simple click on the little left arrow in the upper left of the window.
Click on a item so see its attributes.
Unless you have a tactical or role playing reason to spam others ![]() use /tellpet when issuing commands to your pets.
use /tellpet when issuing commands to your pets.
You
can now communicate across Galaxies! Use [Galaxyname].[Charactername]
in tells and game mail. For example, if you are on Ahazi
and want to send a message to your friend Luuke on Sunrunner,
simply type /tell Sunrunner.Luuke
hello. You can type /addfriend Sunrunner.Luuke and he will be on your Friends
List (default CTRL P). Don't forget the important, /addignore Sunrunner.Luuke if you
don't want him bothering you... ![]()
Use aliases for stuff you find yourself typing out, but don't want
to use a toolbar slot for. Best are two letter acronyms, so you can
remember them. For example, /alias mb /
While waiting for a shuttle you can use the ingame alarm feature (Control-O then choose
alarm) to set a reminder for when it is going to take off. Then you
can freely shop, or chat without having to worry about missing the next
one. (You can just type "/alarmaddin <hours> <minutes>
<message>" for a timer alarm or "/alarmaddat <hours> <minutes>
<message>" for a specific time, like
By default, CTRL T automatically starts
a /tell. CTRL R starts a /reply. CTRL G starts a /groupchat.
You
can use hex code with in-game emails to add color to text in the message body, however the system will not display the characters
while you type. For example, if you type "Hello my old
\#ff0000\friend." The "\#ff0000\" would not show up as you typed
it but "friend." would appear as red.
ALT-ENTER switches
between full screen and windowed mode. Useful for checking
out of game email or checking websites. You can also ALT-TAB to switch
to other applications, good for fooling the boss into thinking you are working.
You can potentially speed up travel
between starports/shuttleports you often visit (if
you are miner or other frequently traveling profession) by purchasing a couple
travel ticket instead of just one, that way you can simply jump ship to ship
and often travel up to 5 times before the ship leaves for 10 minutes.
Many
people will likely want the swoop bike simply because it is the fastest vehicle
around. You should weigh the pros and cons of each vehicle and mount.
Going fastest has some pretty big trade-offs (especially for the traveler on a
budget). Chapter 12 of the online
manual goes into some additional detail.
You
can rotate furniture in fine tuned angles by typing rotate left or right in
smaller measurements by such as /rotate left 1 (for
one degree) up to 360.
Use
/examine on enemies to see what type of damage they
are resistant against or vulnerable to. You may want to switch weapon if the
one you are using does little or no damage against the enemy.
Use /notepad to
take personal notes. Note, these are
stored on your computer (not the server). They are also not character specific
(meaning you can see your notepad notes regardless which character/server you
are playing on).
In
your Friends List (default CTRL P), you can easily send mail to multiple people
by highlighting their names (with SHIFT click or CTRL click) and then press the
Mail button; it will bring up a new message with their names automatically
separated by semi-colons.
By default use CTRL and Mouse
Wheel to change the size of icons or text when hovering the cursor over your
inventory, datapad or chat window.
Use
/r for replying to the last person to send you a tell.
Use /rt to reply to the last
person you sent a tell to. It cuts down on sending messages to the wrong person
accidentally.
Here's
a trick for getting Apprentice XP- create a hotkey macro that has a polite
invitation (such as "I would gladly teach you that skill, friend.") and
/invite. When you see someone asks for a skill that you can teach, immediately
hit the hotkey. Your speedy group invite and
cordial message will usually gets better results.
There
is a copy/paste text command in the Key Map listing. By default they are not
assigned to to any keys, but you can easily change
them if you are used to using those commands in word programs.
For those
with terrain movement bonuses, hold down your shift key (walk) every
once in a while to let slower group members catch up. That way you don't have
to continually stop to wait for them.
Looking for an entertainer? In the
"Find a Location" listing on your planetary map, cantinas that have
a sun symbol next to them have a registered player Musician or Dancer
at work there.
Talk
to NPCs especially the ones near the exits to towns.
They sometimes give descriptions of and waypoints to interesting locations.
Use CRTL UP ARROW to go to a previous
command.
In
your Options screen under graphics, you can easily adjust your Field of View
slider. By default it is 60 degrees to simulate normal perception (for your
computer screen). Some people like to move it up to around 90 degree to be more
like First Person Shooters (allowing you to see more of what's around you but
with a slightly "fish-bowl" perception)
Missions given out at terminals will
have their difficulty based on the weapon that you currently have equipped. If
you have your primary weapon out, but plan on using one with which you have
less skill, you will probably be in over your head when you get to the spawn.
Same goes for the number of people in your group.
You generally don't need to type all of
the letters in a command. You can shorten the command as long as there isn't a
similar command that comes before it alphabetically. For example, /dia will do the same as /diagnose.
Under
Options (Ctrl O), in the Misc section, you can now
check the Show arrows to Waypoints Onscreen option.
This will show direction and distance to all of your highlighted waypoints.
Right click on it to bring up a list of all your waypoints. Left click to
activate one or more.
Beware
of the hermit droid engineer on Lok. He doesn't take
kindly to those who enter his cavernous home which is rumored to be within 100
meters of 3200 -4800.
Send
game mail to yourself with important notes. Some players write reminders for
when to pay maintenance and the like in the subject line. When they log on,
they just open their mail (CTRL E) and sort by user to see what notes they left
for themselves.
Always
examine an item before you click accept trade (or purchase). There are
some scoundrels out there looking to pass off shoddy goods as rare gems.
Fill out your character profile by
opening up the Character page in the Community Window (default CTRL P). You
don't have to be long winded, just give a little information about your
character and his/her goals. Examining other players to see their
biography is a great starting point for role playing. "Hey I grew up in the
outer rim too, where ya from?"
Type /LFG to let others know you
are interested in joining a group. You can so a /who lfg
to see everyone near you who is also looking for a group to join. Type /lfg again when you are no
longer looking for a group.
Pick up multiple starting professions. It costs a lot of skill points,
but you can always surrender these novice skills back later when you need the
points. Having several starting professions makes you more versatile
and helps you to figure out what you like doing.
After using the /find command in a city, type /find clear to remove the waypoint and
arrows.

![]()
![]()
![]()