| |
|
 |
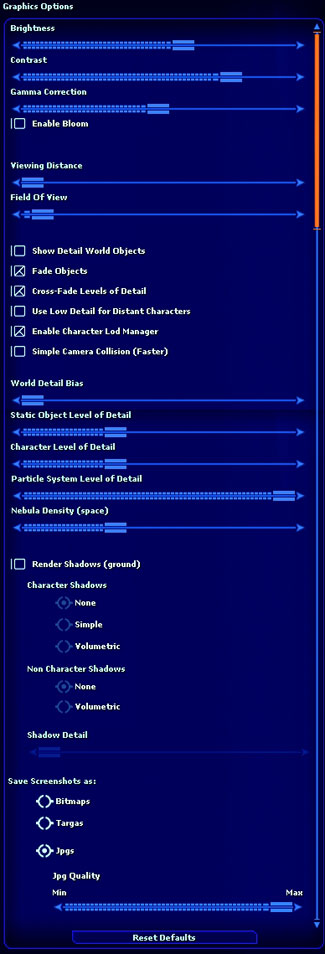
| Graphics |
| Brightness (slider): Increase/Decrease Brightness |
| Contrast (slider): Increase/Decrease Contrast |
| Gamma correction (slider): Increase/Decrease Gamma |
| Enable Bloom(checkbox): Light Glow effect (recommended only for high end DirectX 9c cards) |
| Viewing Distance (slider): Increase/Decrease draw distance |
| Field of View(slider): Increase/Decrease angle of View |
| Show Detail World Objects(checkbox): Obsolete |
| Fade Objects (checkbox): Toggle to fade objects into view instead of just appearing. |
| Cross-Fade Levels of Detail (checkbox): Ease in the level of detail instead of hard switch. Looks more smooth. |
| Use Low Detail for Distant Characters(checkbox): Non Textured in Distance |
| Enable Character LOD Manager (checkbox): Toggle On/Off Level Of Detail Manager. Limits number of high detail objects displayed |
Simple Camera Collision (Faster) This is for 3rd person. When the camera backs into a wall or other obstacle, the camera doesn't push through it, but rather collides
with it. Simple camera collision treats the camera like 1 point in space. Non-simple camera collision treats it as 4 or 5 |
| World Detail Bias(slider): Static Object details(buildings, POIs, etc) |
| Static Object Level of Detail (slider): Non player/creature Object detail Level: trees, Guns, vehicles, camps, player houses, etc... |
| Character Level of Detail(slider): Character/Creature/Droid detail level |
| Particle System Level of Detail(slider): Number of Particles displayed |
| Nebula Density(space) (slider): Thickness of Nebula |
| Render Shadows ground(checkbox): Toggle shadows on/off |
| Character shadows - None - Simple - Volumetric (checkbox): Amount of shadow detail. Volumetric is highest level. |
| NonCharacter Shadows - None - Volumetric(checkbox): Buildings etc... |
| Shadow Detail (slider): Resolution of shadows |
| Save Screenshots as Bitmaps - Targas - Jpgs (checkbox): Type of file to save Screenshots |
| Jpg Quality(slider): Increase/Decrease Screenshot quality | |
 |
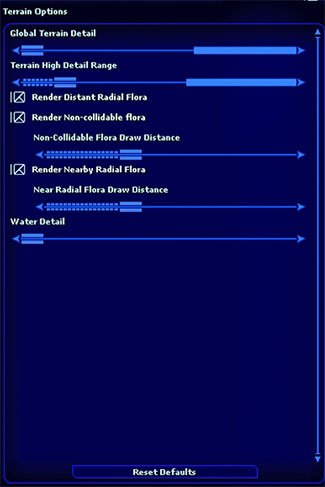
| Terrain Options |
| Global Terrain Detail (slider): Forces scale of detail bands around character. |
| Terrain High Detail Range (slider): Forces ring diameter of High detail band around character larger/smaller |
| Render Distant Radial Flora (checkbox): Toggle On/Off distant trees |
| Render Non-collidable flora (checkbox): Toggle On/Off bushes, rocks, other uncollidable flora |
| Non-Collidable Flora Draw Distance (slider): Increase/Decrease draw distance |
| Render Nearby Radial Flora (checkbox): Toggle On/Off grass/carpet flora |
| Near Radial flora draw distance (slider): Increase/Decrease draw distance of grass/carpet flora |
| Water Detail (slider): Increase/Decrease water polygon count and reflections. | |
 |
Expanded Definitions:
Graphics:
Brightness (slider): Click on left arrow with left mouse button to decrease brightness one click at a time or click and hold the little square box that resides on the slider with left mouse button and drag to the left to decrease brightness. Click on right arrow with left mouse button to increase brightness one click at a time or click and hold the little square box that resides on the slider with left mouse button and drag to the right to Increase brightness.
Contrast (slider):
Click on left arrow with left mouse button to decrease Contrast one click at a time or click and hold the little square box that resides on the slider with left mouse button and drag to the left to decrease Contrast. Click on right arrow with left mouse button to increase Contrast one click at a time or click and hold the little square box that resides on the slider with left mouse button and drag to the right to Increase Contrast.
Gamma correction (slider):
Click on left arrow with left mouse button to decrease Gamma correction one click at a time or click and hold the little square box that resides on the slider with left mouse button and drag to the left to decrease Gamma correction. Click on right arrow with left mouse button to increase Gamma correction one click at a time or click and hold the little square box that resides on the slider with left mouse button and drag to the right to Increase Gamma correction.
Enable Bloom (checkbox):
To enable bloom effects, click the box with left mouse button to put a check mark in the box. To Disable bloom effects, click the box with left mouse button to remove the check mark. Bloom is a Light Glow effect that enhances light sources and is only recommended only for use with high end DirectX 9c cards.
Viewing Distance (slider):
Click on left arrow with left mouse button to decrease draw distance one click at a time or click and hold the little square box that resides on the slider with left mouse button and drag to the left to decrease draw distance. Click on right arrow with left mouse button to increase draw distance one click at a time or click and hold the little square box that resides on the slider with left mouse button and drag to the right to Increase draw distance.
Field of View (slider):
Click on left arrow with left mouse button to decrease angle of view one click at a time or click and hold the little square box that resides on the slider with left mouse button and drag to the left to decrease angle of view. Click on right arrow with left mouse button to increase angle of view one click at a time or click and hold the little square box that resides on the slider with left mouse button and drag to the right to Increase angle of view.
Show Detail World Objects (checkbox):
This setting is obsolete, meaning that it is no longer in use.
Fade Objects (checkbox):
To enable objects to fade into view instead of just appearing, click the box with left mouse button to put a check mark in the box. To disable objects fading into view instead of just appearing, click the box with left mouse button to remove the check mark.
Cross-Fade Levels of Detail (checkbox):
To enable cross-fade levels of detail, click the box with left mouse button to put a check mark in the box. To disable cross-fade levels of detail, click the box with left mouse button to remove the check mark. Enabling cross-fade levels of detail will cause objects to ease in the level of detail instead of hard switching which makes the transition look smooth.
Use Low Detail for Distant Characters (checkbox):
To enable low detail for distant characters, click the box with left mouse button to put a check mark in the box. To disable low detail for distant characters, click the box with left mouse button to remove the check mark. Enabling this feature will cause distant characters to not be textured.
Enable Character LOD Manager (checkbox):
To enable the level of detail manager, click the box with left mouse button to put a check mark in the box. To disable the level of detail manager click the box with left mouse button to remove the check mark. Enabling this feature will limit the number of high detail objects displayed.
Simple Camera Collision (Faster) (checkbox):
To enable Simple Camera Collision, click the box with left mouse button to put a check mark in the box. To disable Simple Camera Collision, click the box with left mouse button to remove the check mark. This feature is for 3rd person view. When the camera backs into a wall or other obstacle, the camera doesn't push through it, but rather collides with it. Simple camera collision treats the camera like 1 point in space. Non-simple camera collision treats it as 4 or 5.
World Detail Bias (slider):
Click on left arrow with left mouse button to decrease World Detail Bias one click at a time or click and hold the little square box that resides on the slider with left mouse button and drag to the left to decrease World Detail Bias. Click on right arrow with left mouse button to increase World Detail Bias one click at a time or click and hold the little square box that resides on the slider with left mouse button and drag to the right to Increase World Detail Bias. This affects static object details(buildings, POIs, etc).
Static Object Level of Detail (slider):
Click on left arrow with left mouse button to decrease Static Object Level of Detail one click at a time or click and hold the little square box that resides on the slider with left mouse button and drag to the left to decrease Static Object Level of Detail. Click on right arrow with left mouse button to increase Static Object Level of Detail one click at a time or click and hold the little square box that resides on the slider with left mouse button and drag to the right to Increase Static Object Level of Detail. This feature affects the level of detail of Non player/creature Object detail Level: trees, Guns, vehicles, camps, player houses, etc...
Character Level of Detail (slider):
Click on left arrow with left mouse button to decrease Character Level of Detail one click at a time or click and hold the little square box that resides on the slider with left mouse button and drag to the left to decrease Character Level of Detail. Click on right arrow with left mouse button to increase Character Level of Detail one click at a time or click and hold the little square box that resides on the slider with left mouse button and drag to the right to Increase Character Level of Detail. This feature affects Character/Creature/Droid detail levels.
Particle System Level of Detail (slider):
Click on left arrow with left mouse button to decrease Particle System Level of Detail one click at a time or click and hold the little square box that resides on the slider with left mouse button and drag to the left to decrease Particle System Level of Detail. Click on right arrow with left mouse button to increase Particle System Level of Detail one click at a time or click and hold the little square box that resides on the slider with left mouse button and drag to the right to Increase Particle System Level of Detail. This feature raises and lowers the number of Particles displayed.
Nebula Density (space) (slider):
Click on left arrow with left mouse button to decrease Nebula Density one click at a time or click and hold the little square box that resides on the slider with left mouse button and drag to the left to decrease Nebula Density. Click on right arrow with left mouse button to increase Nebula Density one click at a time or click and hold the little square box that resides on the slider with left mouse button and drag to the right to Increase Nebula Density. This feature increases and decreases the thickness of nebula in space.
Render Shadows ground (checkbox):
To enable shadows effects, click the box with left mouse button to put a check mark in the box. To Disable shadows effects, click the box with left mouse button to remove the check mark.
Character shadows - None - Simple - Volumetric (checkbox):
To enable simple shadows, click the box with left mouse button to put a check mark in the box next to simple. To enable volumetric shadows, click the box with left mouse button to put a check mark in the box next to volumetric. To Disable shadows, click the box with left mouse button to put a check mark next to none. This feature adjusts the Amount of shadow detail from none to volumetric which is the highest level.
Non-Character Shadows - None - Volumetric (checkbox):
To enable volumetric shadows, click the box with left mouse button to put a check mark in the box next to volumetric. To disable shadows, click the box with left mouse button to put a check mark next to none. This feature adjusts the Amount of shadow detail from none to volumetric which is the highest level for Buildings and other client side static objects.
Shadow Detail (slider):
Click on left arrow with left mouse button to decrease Shadow Detail one click at a time or click and hold the little square box that resides on the slider with left mouse button and drag to the left to decrease Shadow Detail. Click on right arrow with left mouse button to increase Shadow Detail one click at a time or click and hold the little square box that resides on the slider with left mouse button and drag to the right to Increase Shadow Detail. This feature increases and decreases the resolution of shadows.
Save Screenshots as Bitmaps - Targas - Jpgs (checkbox):
To save screenshots as bitmaps, click the box with left mouse button to put a check mark in the box next to bitmaps. To save screenshots as targas, click the box with left mouse button to put a check mark in the box next to targas. To save screenshots as jpgs, click the box with left mouse button to put a check mark in the box next to jpgs. This feature changes the type of file to screenshots are saved as
Jpg Quality (slider):
Click on left arrow with left mouse button to decrease Jpg Quality one click at a time or click and hold the little square box that resides on the slider with left mouse button and drag to the left to decrease Jpg Quality. Click on right arrow with left mouse button to increase Jpg Quality one click at a time or click and hold the little square box that resides on the slider with left mouse button and drag to the right to Increase Jpg Quality. This feature increases and decreases the quality of the jpg screenshot file. The higher the quality the larger the file size will be.
Terrain:
Global Terrain Detail (slider):
Click on left arrow with left mouse button to decrease Global Terrain Detail one click at a time or click and hold the little square box that resides on the slider with left mouse button and drag to the left to decrease Global Terrain Detail. Click on right arrow with left mouse button to increase Global Terrain Detail one click at a time or click and hold the little square box that resides on the slider with left mouse button and drag to the right to Increase Global Terrain Detail. This feature increases and decreases the size of the level detail bands around character. There are 3 bands, High detail near character, Medium detail at medium distance from character, and Low Detail at far distances from character.
Terrain High Detail Range (slider):
Click on left arrow with left mouse button to decrease Terrain High Detail Range one click at a time or click and hold the little square box that resides on the slider with left mouse button and drag to the left to decrease Terrain High Detail Range. Click on right arrow with left mouse button to increase Terrain High Detail Range one click at a time or click and hold the little square box that resides on the slider with left mouse button and drag to the right to Increase Terrain High Detail Range. This feature forces the ring diameter of the high detail band around character to increase or decrease.
Render Distant Radial Flora (checkbox):
To enable Distant Radial Flora, click the box with left mouse button to put a check mark in the box. To Disable Distant Radial Flora, click the box with left mouse button to remove the check mark. This feature turns on and off the trees you see in the far off distance.
Render Non-collidable flora (checkbox):
To enable Non-collidable flora, click the box with left mouse button to put a check mark in the box. To Disable Non-collidable flora, click the box with left mouse button to remove the check mark. This feature turns on and off the small bushes, rocks etc... that you can not collide with.
Non-Collidable Flora Draw Distance (slider):
Click on left arrow with left mouse button to decrease Non-collidable Flora Draw Distance one click at a time or click and hold the little square box that resides on the slider with left mouse button and drag to the left to decrease Non-collidable Flora Draw Distance. Click on right arrow with left mouse button to increase Non-Collidable Flora Draw Distance one click at a time or click and hold the little square box that resides on the slider with left mouse button and drag to the right to Increase Non-Collidable Flora Draw Distance. This feature will increase or decrease the distance at which non collidable objects will draw.
Render Nearby Radial Flora (checkbox):
To enable Nearby Radial Flora, click the box with left mouse button to put a check mark in the box. To Disable Nearby Radial Flora, click the box with left mouse button to remove the check mark. This feature will turn on and off the grass and carpet type flora.
Near Radial flora draw distance (slider):
Click on left arrow with left mouse button to decrease the Near Radial flora draw distance one click at a time or click and hold the little square box that resides on the slider with left mouse button and drag to the left to decrease the Near Radial flora draw distance. Click on right arrow with left mouse button to increase the Near Radial flora draw distance one click at a time or click and hold the little square box that resides on the slider with left mouse button and drag to the right to Increase the Near Radial flora draw distance. This feature increases and decreases the draw distance of grass/carpet flora
Water Detail (slider):
Click on left arrow with left mouse button to decrease Water Detail one click at a time or click and hold the little square box that resides on the slider with left mouse button and drag to the left to decrease Water Detail. Click on right arrow with left mouse button to increase Water Detail one click at a time or click and hold the little square box that resides on the slider with left mouse button and drag to the right to Increase Water Detail. This feature will increase and decrease the water polygon count and reflections.
|
|
|
 |
|
 |
|
 |
|
 |
|