|
Experimentation: The Key to Success
To craft a really good item you have to experiment on it during its construction. This special phase of crafting is available only when you're using a specialized tool, and are in the presence of the proper crafting station.
You may have seen the crafting stations around the cities, and maybe you wondered what they were for. They're public stations - anybody can use them - and they have specialized uses just like the crafting tool you keep in your inventory.
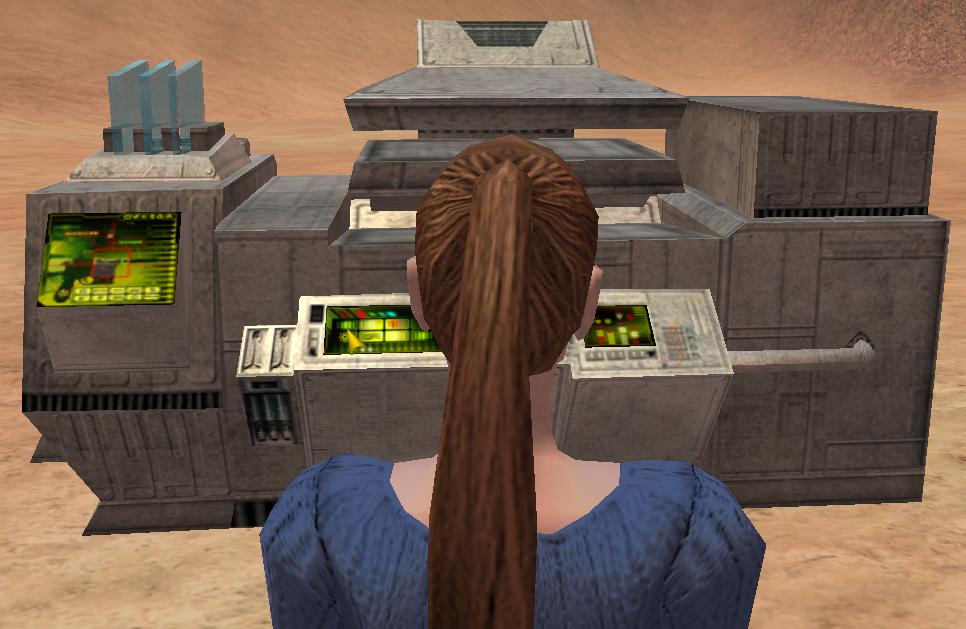
Here's a picture of yours truly standing in front of a public weapon crafting station:
 These public crafting stations are available in almost every city, and you may even see them in higher level campsites, and even private stations in people's homes. These public crafting stations are available in almost every city, and you may even see them in higher level campsites, and even private stations in people's homes.
When I use my specialized weapon crafting tool while I'm in the presence of this behemoth, I get the option to experiment on whatever I'm making.
You get more points to experiment with as you become a higher-level crafter. But be careful as you spend them; experimentation can be a risky business.
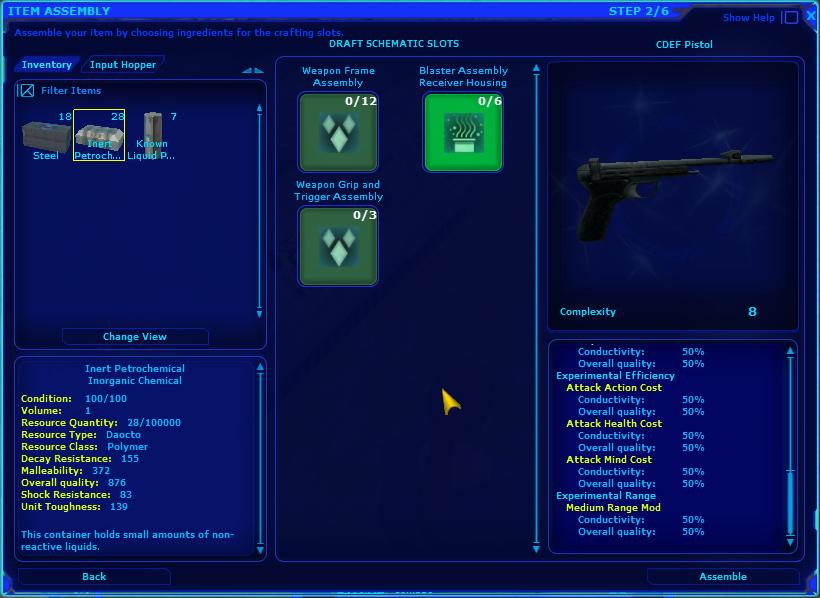
I'll give you an example of experimentation as I create a weapon using a specialized weapon crafting tool and a public weapon crafting station. I'll make something simple: a CDEF pistol. It takes metal and chemicals to create.
 As you can see I only have one type of metal available for crafting right now, but I have two types of chemicals. Some Inert Petrochemicals, and some Known Liquid Petrochemicals. As you can see I only have one type of metal available for crafting right now, but I have two types of chemicals. Some Inert Petrochemicals, and some Known Liquid Petrochemicals.
I should figure out which one of these will be better for crafting my new CDEF pistol. To do that we'll look at the Experimental Ratings of the weapon I'm trying to make.
It looks like everything is related to Overall Quality and Conductivity.
Let's look at the two chemicals I have available. We can see their attributes in the bottom left hand corner of the screen.
Here is a picture of the two chemical's attributes side by side so that we can see what the differences are.
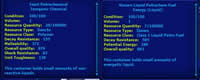
Neither of these has a conductivity value; it's 0 for both. Given that, the only thing I have to compare is the Overall Quality. As you can see, the Known Liquid Petrochem Fuel Energy on the right has an Overall Quality of 963. That's pretty good, and it's a little higher than the 876 that the Inert Petrochemical has, so I'll use the Liquid to make my blaster.
 Selecting my resources and hitting next takes me to the Crafting Summary sceen. Selecting my resources and hitting next takes me to the Crafting Summary sceen.
This shows me the values that my newly created pistol will have in the upper left-hand corner, a picture of the object I'm creating in the upper right-hand corner, and across the bottom of the screen a breakdown of the experimental attributes.
The green bars represent how much experimentation I already have in each of the different attributes.
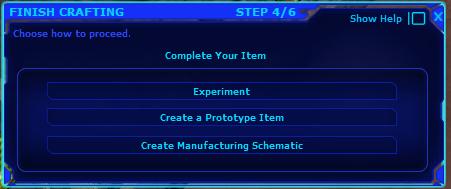
 Now I can choose to Experiment, Create a Prototype Item, or Create a Manufacturing Schematic. Now I can choose to Experiment, Create a Prototype Item, or Create a Manufacturing Schematic.
Creating a Prototype Item will simply make the item without doing any experimentation. You may want to do this if you aren't interested in experimenting on your newly created item, or if you're just in a hurry to create an item for some reason.
Creating a Manufacturing Schematic is useful if you craft a really good item. With a manufacturing schematic and the exact same ingredients you just used, a factory operator can make identical copies of the item you just created. And remember, you'll get to decide on whether to make a prototype or a manufacturing schematic again after experimentation is done.
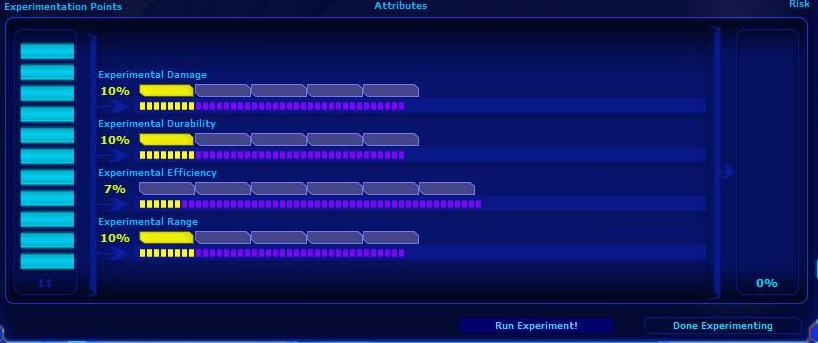
Let's do some experimentation. Here's what that screen looks like:

The upper left-hand corner again shows the current attributes of my item, and the upper right has a picture of what I'm making. Across the bottom, however, we now have the experimentation bars. Let's take a closer look.
 On the left-hand side are my Experimentation points. I have 11 of them. If I put a couple of those points into Experimental damage the screen changes. To put the points in one of the possible Experimentation Attributes, simply click on the large empty boxes. On the left-hand side are my Experimentation points. I have 11 of them. If I put a couple of those points into Experimental damage the screen changes. To put the points in one of the possible Experimentation Attributes, simply click on the large empty boxes.
The large boxes colored yellow that are there indicate that you've already been granted at least 10% or one experimentation point's worth of upgrade in each of those attributes. Notice that Experimental Efficiency, or the third attribute down, doesn't have a big yellow box. That's because it only has 7% of the maximum possible attribute for that category.
I'm going to put two more experimentation points into Experimental Damage, and then see what happens.
You can see now that I have two green boxes in the Experimental Damage attribute, and that I now only have 9 experimentation points left. Notice that the 10% didn't go up yet. That's because I haven't run the experiment just yet.
Remember! There's always risk involved in experimentation. I might be able to make the item a lot better, or I might fail miserably and make it worse.
Fortunately for me, I had a great success!
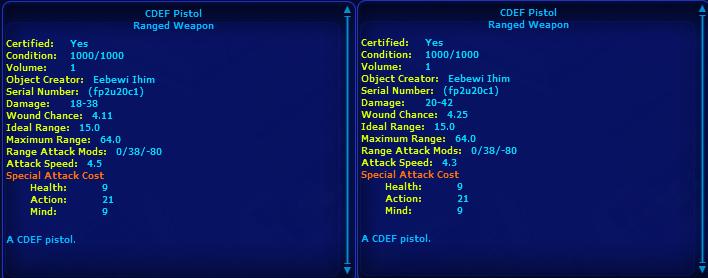
 And now you can see that I have two boxes filled in and I'm up to 24%. To give you an example of what this does, I'll show you what the attributes for the weapon used to be, and what they are now. Notice the difference in the weapon damage. And now you can see that I have two boxes filled in and I'm up to 24%. To give you an example of what this does, I'll show you what the attributes for the weapon used to be, and what they are now. Notice the difference in the weapon damage.
The Damage on the left is 18-38. That was before experimentation.  The damage on the right is now 20-42. A little better. Also note that on the left the Attack Speed was 4.5, and on the right it's 4.3. The weapon does a little more damage, and it's a little faster. On top of that, the wound chance has increased from 4.11 to 4.25. Overall I'd say the experimentation improved this weapon a fair amount. And I could do more. Remember I still have 9 experimentation points left, and I got this bit of increase using only 2 of them. The damage on the right is now 20-42. A little better. Also note that on the left the Attack Speed was 4.5, and on the right it's 4.3. The weapon does a little more damage, and it's a little faster. On top of that, the wound chance has increased from 4.11 to 4.25. Overall I'd say the experimentation improved this weapon a fair amount. And I could do more. Remember I still have 9 experimentation points left, and I got this bit of increase using only 2 of them.
Note that repeated experimentation increases the item's complexity. The more complex the item, the more it will cost to insure. So there's a gamble here - experiment in small bits, or experiment all at once.
Remember that using the right resources, and experimenting with your item can always help to make it better. In fact, using resources with better attributes can give you even more experimentation points to play with.
Back
|