|
Understanding Ship Components
By Kurt "Thunderheart" Stangl and Will "Darth Platypus" Wallace
Once you get rid of your recruiter-issued ship and start looking at buying your first chassis, you will want to know how all the different components affect the performance of your ship. A good pilot should know what their ship can do when a dogfight starts to get hairy. A great pilot knows everything about their ship, every component and exactly how those components are going to perform in intense combat.
Use this guide to understanding components help you get from being a good pilot to being a great pilot.
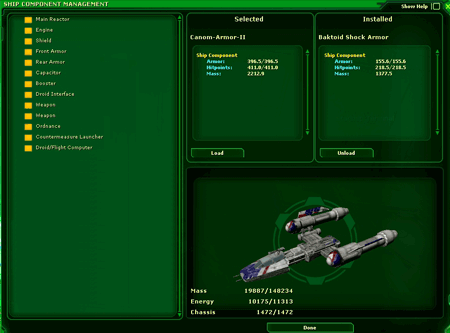
First, access your Ship Component Management screen at a Starship Terminal. Use the radial menu to pull up your ship access and instead of clicking "Travel" or "Launch into Space", click, "Manage Components". This will open your "Ship Component Management" window.
On the left hand side of the window, you will see a list of ship components. Simply double-click the component type to open up the list. Once you do that, you will see a list of available components to load onto your ship. When you click on a component, the component and all of its statistics will be viewable in the "Selected" window in between the component selection list and Installed component windows. If you like the component you have selected, then click the "Load" button to load that component onto your ship. You should do this for your basic component needs to get your ship into space and ready for combat.
As you start working your way through the tiered pilot missions, you will begin to accumulate more and more ship components and you will want to hang on to the best components to load into your ship. This will give you the edge you need as you work your way to being an Ace pilot.
But how do you know which components are best?
There is a quick and easy way to compare components in your Ship Component Management window. When you double click on the list of components on the left hand side of the window, it will list all available components. The component that is installed will be labeled, "LOADED" just to the right of the component description. Any component that is currently loaded onto your ship will appear in the "Installed" window. Then, you can click once on the other components in the list and the statistics for these will appear in the "Selected" window, but now that you have them side by side, what do all those stats and numbers mean?
Here is a guide to understanding components and the basics of how to interpret the stats for all the parts you will need for your ship:
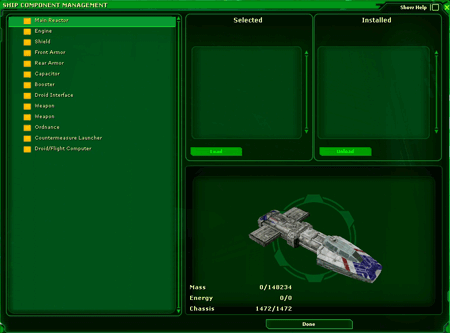
Ship Component Management Window
The first set of numbers appears in the lower right of the Ship Component Management Window, underneath the picture of your ship.
Mass
The number on the right represents the "Mass Capacity" of a ship. Each component has a mass value that contributes to filling up the mass capacity of a ship. The number on the left represents the total mass of all installed components on a ship.
Energy
The number on the right is the same as your Reactor's "Reactor Generation Rate"- - it is the amount of energy produced by your reactor at any given time. Every component installed on a ship requires a certain part of that generation rate. The total "Reactor Energy Drain" of all installed components is the number displayed on the left.
Chassis
This is simply the Current/Total hitpoints of your starfighter.
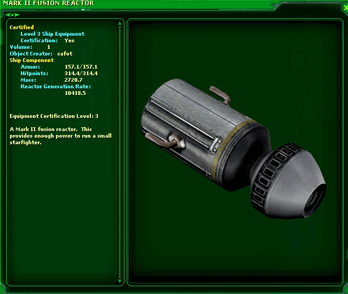
Main Reactor
This component provides your starship with raw power.
Armor
Armor points are depleted before hit points when calculating damage.
Hitpoints
Hitpoints are depleted after the shields and armor is gone. This number also decays when
a component is repaired at a rate of 1pt per 10 pts repaired.
Mass
Mass represents the amount of mass that this component will subtract from the total amount of mass your ship can handle.
Reactor Regeneration Rate
This is the amount of energy your reactor can produce. It is the same as the amount of Energy listed on your Ship Component Management screen.
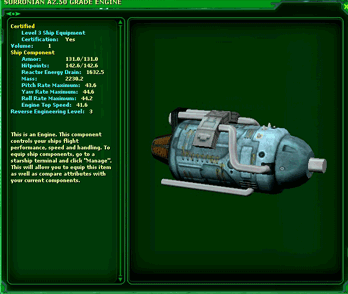
Engine
This component controls your starship's flight performance.
Armor
Armor points are depleted before hit points when calculating damage.
Hitpoints
Hitpoints are depleted after the shields and armor is gone. This number also decays when
a component is repaired at a rate of 1pt per 10 pts repaired.
Reactor Energy Drain
This is the amount of reactor regeneration drain that the component will demand of your reactor.
Mass
Mass represents the amount of mass that this component will subtract from the total amount of mass your ship can handle.
Pitch Rate Max
Pitch is the rise and fall of the bow of your space craft. This number represents the maximum pitch acceleration of a ship. A higher number means the engine will be nimble and maneuverable, but these factors are limited by the chassis type.
Yaw Rate Max
Yaw is your craft's side to side movement. This number represents the maximum yaw of a ship. A higher number means the engine will be nimble and maneuverable, but these factors are limited by the chassis type as well.
Roll Rate Max
Roll is your ship's ability to roll on an axis from side to side. This number represents the maximum ability of your ship to roll. A higher number means the engine will be nimble and maneuverable, but these factors are limited by the chassis type also.
Engine Top Speed
This is the top speed of the engine. Move the decimal place one point to the right to get the speed figure that is displayed on your space HUD. Some chassis have additional modifers that can reduce the overall speed depending on the chassis type.
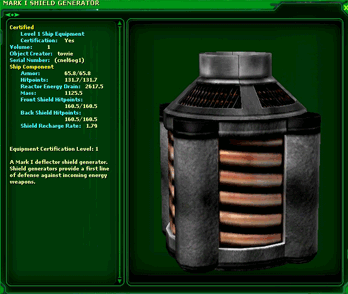
Shield
Your shield generator is your first line of defense against enemy weapons fire.
Armor
Armor points are depleted before hit points when calculating damage.
Hitpoints
Hitpoints are depleted after the shields and armor is gone. This number also decays when
a component is repaired at a rate of 1pt per 10 pts repaired.
Reactor Energy Drain
This is the amount of reactor regeneration drain that the component will demand of your reactor.
Mass
Mass represents the amount of mass that this component will subtract from the total amount of mass your ship can handle.
Front Shield Hitpoints
Current/Max forward shield hitpoints. Shield hitpoints are the first thing depleted by incoming blaster fire. Armor damage will be done only after the shields from the front or back have been completely depleted.
Back Shield Hitpoints
Current/Max rear shield hitpoints. Shield hitpoints are the first thing depleted by incoming blaster fire. Armor damage will be done only after the shields from the front or back have been completely depleted.
Shield Recharge Rate
When your shield points are depleted, they will begin to recharge themselves at the rate of X
points per second, where X is the Shield Recharge Rate value.
Front Armor
This is your starship's armor plating. It is the second layer of defense behind your ship's shields. Front armor defends the front half of your spaceship.

Armor
Armor points are depleted before hit points when calculating damage.
Hitpoints
Hitpoints are depleted after the shields and armor is gone. This number also decays when
a component is repaired at a rate of 1pt per 10 pts repaired.
Mass
Mass represents the amount of mass that this component will subtract from the total amount of mass your ship can handle.
Rear Armor
This is your starship's armor plating. It is the second layer of defense behind your ship's shields. Rear armor defends the back half of your spaceship.
Armor
Armor points are depleted before hit points when calculating damage.
Hitpoints
Hitpoints are depleted after the shields and armor is gone. This number also decays when
a component is repaired at a rate of 1pt per 10 pts repaired.
Mass
Mass represents the amount of mass that this component will subtract from the total amount of mass your ship can handle.
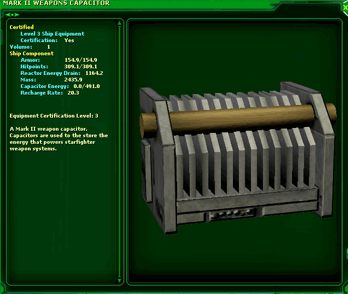
Capacitor
Capacitors are used to store the energy that powers starfighter weapon systems.
Armor
Armor points are depleted before hit points when calculating damage.
Hitpoints
Hitpoints are depleted after the shields and armor is gone. This number also decays when
a component is repaired at a rate of 1pt per 10 pts repaired.
Reactor Energy Drain
This is the amount of reactor regeneration drain that the component will demand of your reactor.
Mass
Mass represents the amount of mass that this component will subtract from the total amount of mass your ship can handle.
Capacitor Energy
Every shot you take with a projectile weapon drains some amount of energy from your capacitors reserve. These numbers are Current/Max capacitor energy reserve. When the capacitor is depleted, you cannot fire projectile weapons again until it has recharged.
Recharge Rate
The capacitor energy reserve is recharged at a rate of X per second, where X is the Capacitor Recharge Rate.
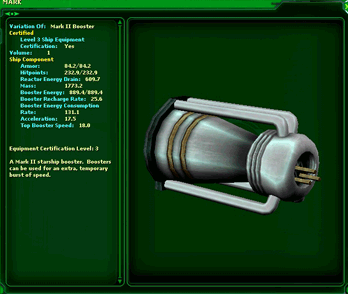
Booster
Adding a booster can give your ship an extra, temporary boost of speed.
Armor
Armor points are depleted before hit points when calculating damage.
Hitpoints
Hitpoints are depleted after the shields and armor is gone. This number also decays when
a component is repaired at a rate of 1pt per 10 pts repaired.
Reactor Energy Drain
This is the amount of reactor regeneration drain that the component will demand of your reactor.
Booster Energy
Booster energy is represented as a X/Y value, where X is current energy and Y is max energy. Booster energy is consumed by the Booster Energy Consumption rate when boosters are engaged.
Booster Recharge Rate
Booster energy reserves are recharged at a rate of X units per second, where X is the Booster Recharge Rate.
Booster Energy Consumption Rate
This is the consumption rate of a booster's energy reserve while the booster is engaged. Energy is drained from the reserve at X units per second, where X is the Consumption Rate.
Acceleration
Higher number = better. This number influences how quickly the booster's speed enhancement accelerates you.
Top Booster Speed
Higher number = better. This number adds to your engine speed when the booster is engaged to give you a faster top speed.
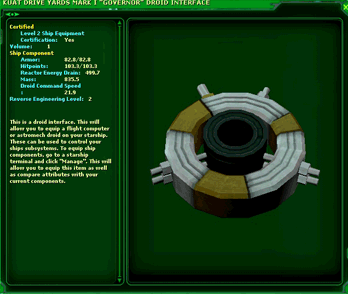
Droid Interface
This ship component will allow you to equip a flight computer or astromech droid on your starship. These can be used to control your ship's subsystems.
Armor
Armor points are depleted before hit points when calculating damage.
Hitpoints
Hitpoints are depleted after the shields and armor is gone. This number also decays when
a component is repaired at a rate of 1pt per 10 pts repaired.
Reactor Energy Drain
This is the amount of reactor regeneration drain that the component will demand of your reactor.
Mass
Mass represents the amount of mass that this component will subtract from the total amount of mass your ship can handle.
Droid Command Speed Lower number = better. This represents the delay between issuing droid commands. A lower number means less delay.
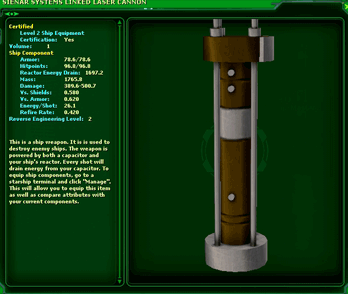
Weapon
Ship weapons are used to destroy enemy ships. The weapon is powered by both a capacitor and your ship's reactor. Every shot will drain energy from your capacitor. The capacitor energy reserve is recharged at a rate of X per second, where X is the Capacitor Recharge Rate (as seen above).
Armor
Armor points are depleted before hit points when calculating damage.
Hitpoints
Hitpoints are depleted after the shields and armor is gone. This number also decays when
a component is repaired at a rate of 1pt per 10 pts repaired.
Reactor Energy Drain
This is the amount of reactor regeneration drain that the component will demand of your reactor.
Mass
Mass represents the amount of mass that this component will subtract from the total amount of mass your ship can handle.
Damage
Min Damage / Max Damage per shot. This represents the minimum/maximum range of damage output your weapons will provide.
Vs. Shields
This is a weapons modifier vs. shields. If the statistic listed a number of 0.47, your weapon would do 47% of its damage versus shield hitpoints. This number is considerably higher for ion cannons and lower for disruptors. A number of greater than 1.0 would mean you actually do EXTRA damage to that component.
Vs. Armor
This is a weapons modifier vs. armor. If the statistic listed a number of 0.47, your weapon would do 47% of its damage versus armor hitpoints. This number is considerably higher for disruptors and lower for ion cannons. A number of greater than 1.0 would mean you actually do EXTRA damage to that component.
(Ion Cannons puncture shields, Disruptors puncture Armor and blasters are not as effective as either, but do both.)
Energy / Shots
This is the weapon's drain-per-shot on the Capacitor Energy reserves of your ship. If your capacitor doesn't have this much stored up, you can't fire.
Refire Rate
This is the time delay between shots from a projectile weapon. A lower number is better.
Ordnance
Ordnance stats are all the same as weapons, except for "Ammo Count" on missile launchers, which shows the displayed missile quantity loaded in that launcher, and "Ammo" on missile packs, which is how much that pack will load into a launcher.
Countermeasure Launcher
Countermeasure Launcher stats are the same as Ordnance stats, except that Damage has been replaced by Effectiveness. For Effectiveness, a higher number = better. This represents a player's "saving throw" of spoofing an incoming missile .
Droid / Flight Computer
The characteristics of a droid/flight computer are determined by the programmable chip that is installed into the droid itself. A droid engineer can make these chips, and pilots can program them.
Good luck and good hunting!
|